Those aren’t fancy sandwitches… The only reason to cut a Butterbrot is to make it fit into a container. Otherwise you just take one bite at a time and chew properly.
6 Likes
Doesn’t work if you have a small mouth. Cutting isn’t about being fancy, it’s about being able to comfortably take the first few bites without making a mess.
4 Likes
Yes it does. I don’t have a big mouth. And any sandwich with a gooey filling will be messy eating no matter how small you cut it.
3 Likes
Just remember, if I ever come over for lunch, that I’mma need a knife to cut my sandwich, whatever it is you do with yours!
6 Likes
If it’s an actual sandwich - those are cut diagonally because it’s tradition.
Besides, plenty of good knives in the silverware drawers.There are a couple of companies that make knives, cutlery, scissors and whatnot within easy driving distance. If you don’t mind buying remaining or surplus stock you can pick up good stuff at very reasonable prices.
4 Likes
I get the feeling I’m not in Kansas anymore!
7 Likes
Grinding: just like highschool but less terrifying.

Everything parks in the freezer for at least 30 minutes. Everything. You want everything that handles the meat to be metal and cold.
If you work your meat hard enough to overheat it. It’ll smear.
You want the meat to be stiff, but at most partially frozen. I like spreading it on a tray. It goes faster and it gets crispy on the edges but the interior just get’s cold and firm. The more frozen bits help keep the grinder chilled, but nothing’s frozen enough to jam the grinder or start losing moisture.

Setup. I use that aluminum roasting pan from a restaurant supply. Helps keep things chillded and has plenty of space. I’ll mound the unground meat away from the machine, and grind right back into it. Grind once through a medium die for regular coarse sausage. Working the meat too much causes smearing, and eventually dry and grainy sausage. Grinding more than once is risky, and tends to emulsify sausage heavily. So reserve it for emulsified sausage.
The bread is to clean the grinder out after. Regular white sandwich bread works best, though potato hotdog buns are close. Kinda squeegees out excess meat.

Grinding. Frozen (or close to) meat on a more powerful grinder will come out like sticks, you might of seen that on the TV. At home it’s limper, like pasta almost. It’s fine though, provided it’s all cold you are safe.
This is the newer aluminum body KA grinder model. And it’s a vast improvement over the older plastic one. Stainless steel blades and dies in standard sizes, gets very cold, very fast. I think the auger is SS too. And it’ll stay that way for smaller batches. Good small scale home grinder.


We grind fat separate, it goes in the freezer at the same time as the meat. So it stays in longer and get’s much more frozen. Fat can be straight up frozen solid if your machine can handle it, the KA does fine with it but the motor here is getting old so I try not too. It’s not mine.

That crud is silver skin and tendons. It clogs your grinder up, blocking die holes and making things smear. You want to open the grinder up between the meat and fat to remove any, and you cut out as much as you can when you prep the meat. This isn’t a lot, not enough to cause an issue. But I still take it out.

Good sausage requires you to add water to keep things plump, and help the meat bind together. About 10% of the weight of the meat. This is less, as there’s moisture in the garlic, onions and leaks.
I like to grind it in as ice, keeps the grinder body cold. Incorporates it pretty well and helps with the bread thing. You can grind it in with either the meat or fat, but save it for the end when the grinder is warming up. Don’t add to much at once. 1-3 cubes bracketed by meat/fat. If you get melted water sloshing around you’ll get some smearing.


That all goes back into the freezer for at least 30 minutes. The thinner you spread it out the faster it’ll go.
Then it’s time for the bread. If you toss the the last couple ice cubes through in between the slices things clean out even more.

Without the ice involved you get this solid bread plug at the end, without the bread there’s some amount of meat that will never come out. And the small amount of bread gives a little bit of binder to the meat. You can grind it into a separate bowl and toss it, which I tend to do for folks with dietary issues.


Later it’s time to get stuffed.
9 Likes
Mad respect here… I don’t have anywhere near that level of ambition.
1 Like
I like to have a different project every spring. Down side of that is I’ve developed a nasty habit of picking up new hobbies and realizing I hate them. My buddy got a real nice 5 gallon brew kit last year. I spend most of my time on that front with cooking related shit, and I’d tried sausage making a few times before and not liked the results.
But last year my dad got really excited about grilled kielbasa for some reason, and he’s difficult to buy gifts for. I managed to score the grinder for cheap, then found a stuffer for like 50 bucks and grabbed a couple books. The idea being I could make the guy some really good kielbasa and learn to make sausage properly in the process. Then my brother got alpha-gal off a lone star tick, and hadn’t had a decent sausage in a year. So I managed to stick with it.
It’s not particularly hard, but it is kind of time consuming. Best results come with breaking it up over 3 days. The hardest, longest and messiest bit is breaking down the meat. Otherwise it’s like 45 minutes, or an hour a day for batches up to 10lbs. Discounting freezer time. The 15lbs of sausage for father’s day last year was a beast with the small equipment though. There were 10lbs of pork, and 5 of duck kielbasa. Kinda over did that one.
4 Likes
I’m enjoying the step-by-step photos of you beating grinding your meat. Can’t wait to see the finished product! A grinder is definitely on the list of things I want to add to my kitchen at some point. Was considering getting one of those add-ons for my stand mixer, but then it crapped the bed and I haven’t figured out what I’m going to do about it yet.
The last time we made sausage it involved breaking down 3 deer. That mess was pretty horrific, but once we got around to the actual grinding, it wasn’t so bad!
5 Likes
For batches below 3 dear size the metal KA grinder works well. Though I wouldn’t recommend the size of mixer I’m using. The motor can handle mixing just about as much meat as you can cram in there. But there really isn’t space for much more than a kilogram (good sausage is metric). And standard batches tend to be 2+kg. Meat over flows the bowl, and the thing shakes around a lot. The hinge pin works its way out.
One of the bigger lift bowl models would work better. A stand mixer is pretty essential even if you don’t use to to grind. So if sausage making is gonna be a thing go bigger and more powerful.
3 Likes
There are three of them which means that by a thing called the Ham Sandwich Theorem (or sometimes the Stone–Tukey Theorem) you could bisect all of them with one cut, even stacked the way they are (and even if they don’t have ham.
5 Likes
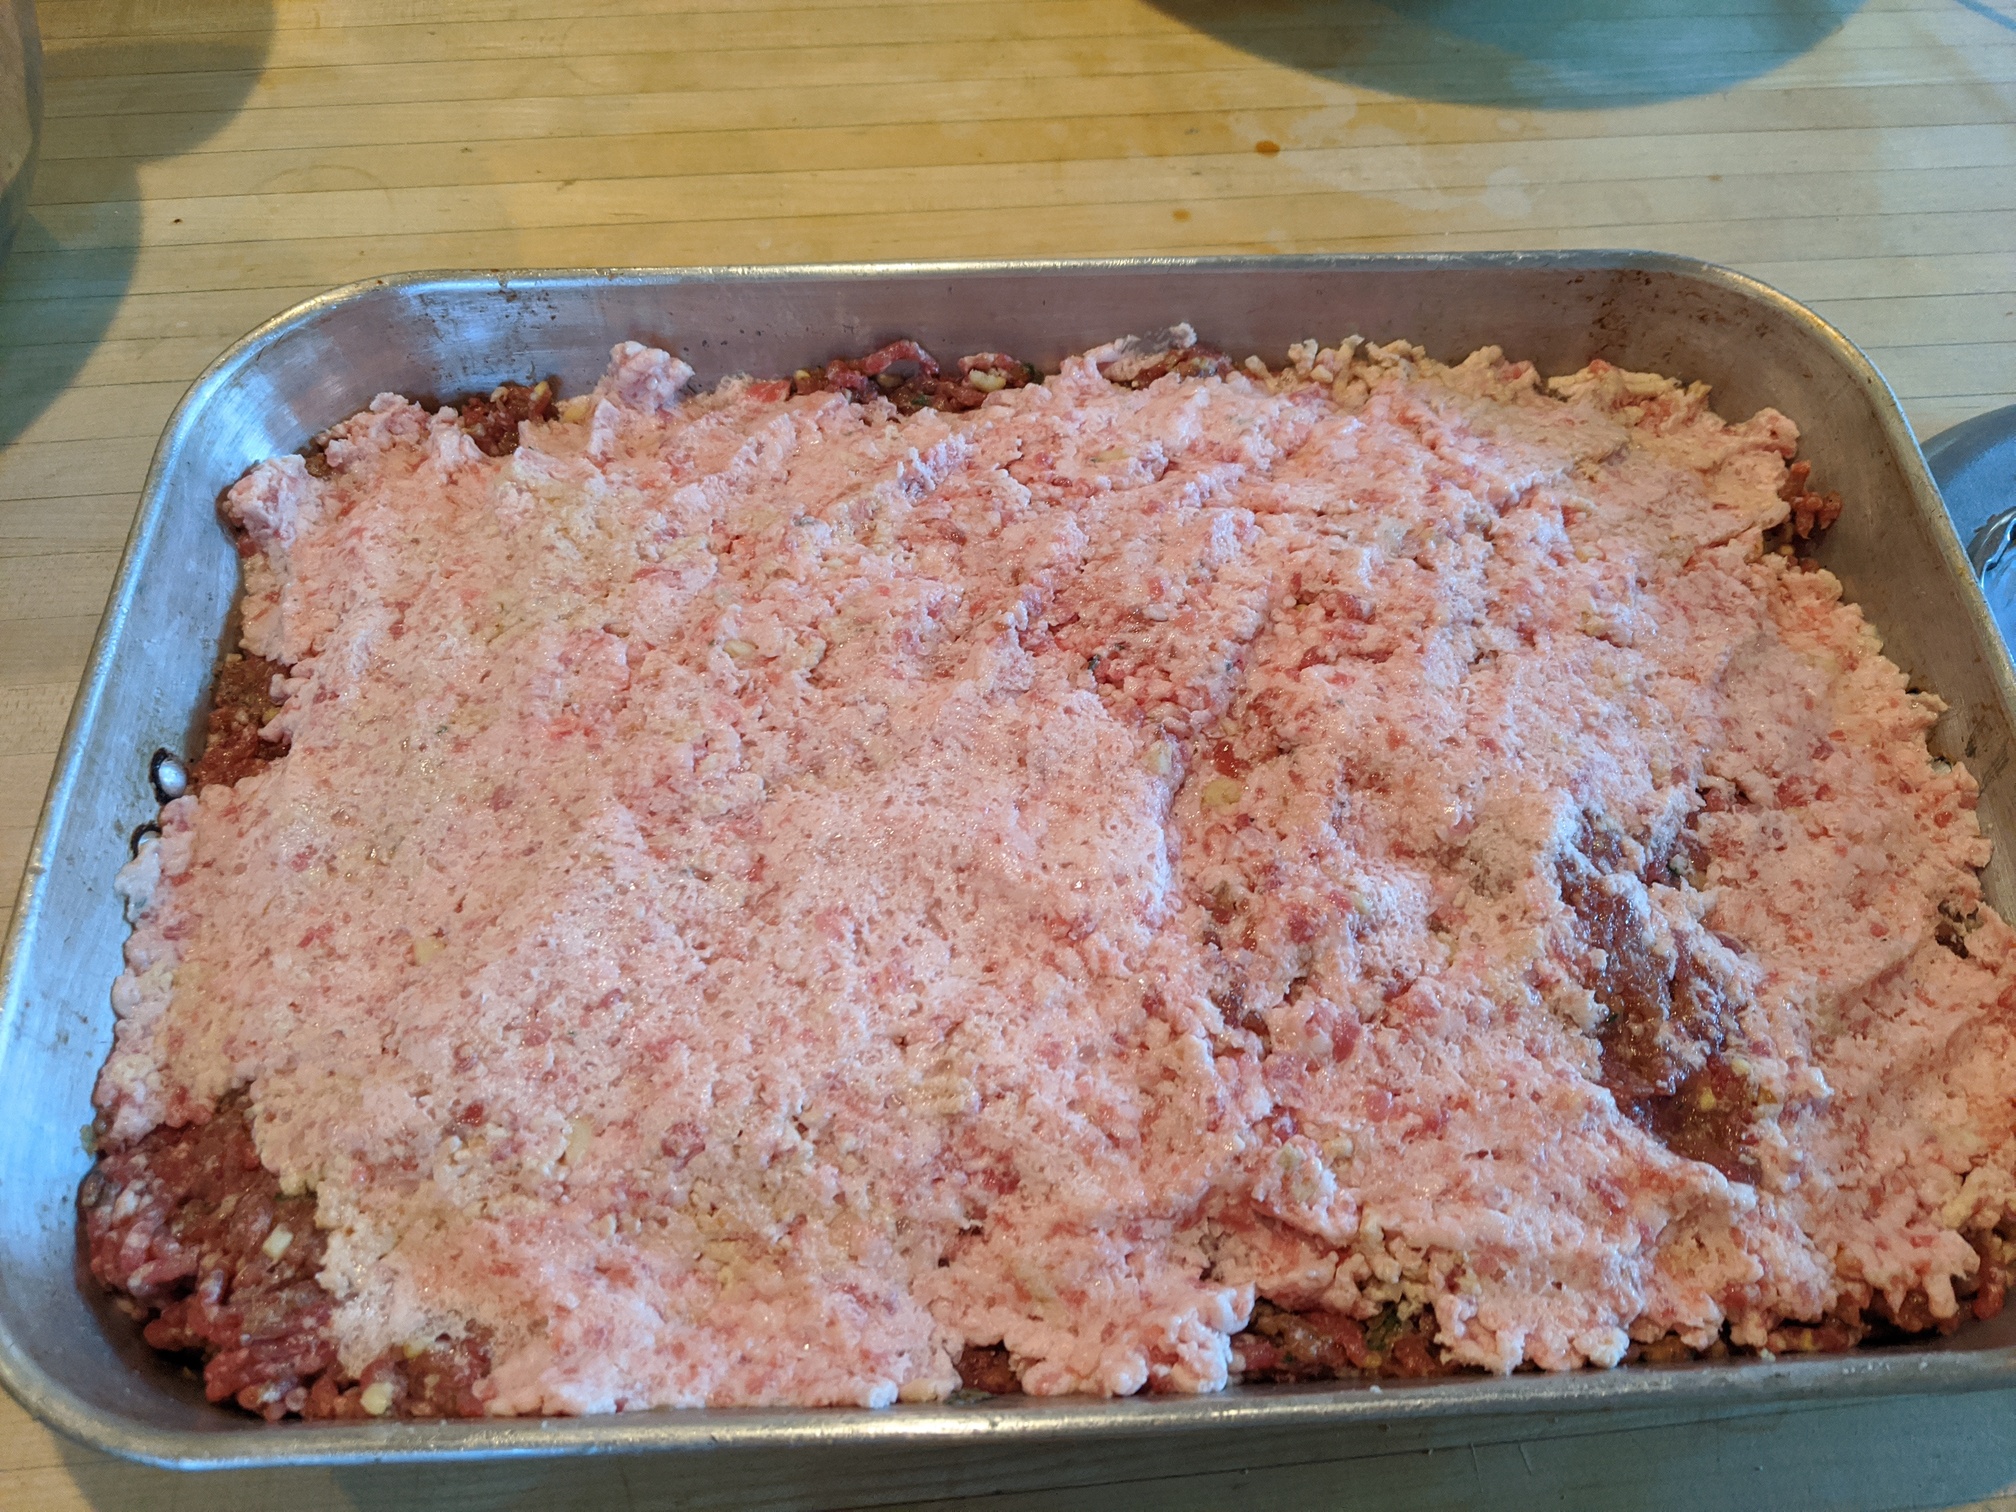
Mixing. I tried something new with this layer cake thing. Meat and fat spread out into a pan, fat on top. After a park in the freezer the fat is frozen solid, most of the meat isn’t. This is good, it’ll prevent smearing and let some of the fat hang out in discrete clumps which is tastey.

The small Kitchenaid won’t fit a full 5lb/2.2kg batch, and this one is closing up on 4kg. So we have hoops to jump through. I basically cut the chilled meat up like brownies, allowing me to portion out 4 even sized portions to mix up. First time I’ve done it this way, worked really really well.


Meat goes into the mixer, starting on low till things start to break up and mix. Then you can mix on medium, at most. You don’t want to go to far here. Friction will heat things up. The fat will begin to render, proteins denature, breaking the emulsion we’re building. Leads to a grainy sausage that can’t hold it’s juices when cooked. And won’t bind properly during stuffing.
That’s the smearing I keep talking about.


What you’re looking for here is what’s called a “primary bind”. It’s a state where the meat protiens and fibers begin to knit together, the fat begins to emulsify into the meat. This requires salt, water and time. Hence the over night salting. The above is mixed, but no bind. Looks like loosely mixed chop meat, and will make shit sausage.


This is the early stage of a primary bind. The meat will begin to ball up on itself, stick to the beater and bowl, and stretch and pull away. This ain’t done yet. Takes just a minute or so on medium (VERY cold if you mix that fast, but I recommend it).
But we have an issue, cause we’re doing 4 rounds of mixing with nothing evenly distributed. If we just mix it all the way shit’ll get weird. So I stop here.


The four partially mixed batches go in the big bowl. You kneed them together like bread to incorporate. Smaller batches you can just mix by hand from the start. Normal 2kg or 2.2kg batches I’ll finishing mixing to the full bind in the bowl.
With this much they’re going back to the stand mixer when they’re evened out. This shit is sticky. Gloves are advised. And it will pull the gloves off. From here on out everything is gonna be covered in an impossibly thin film of pink emulsified meat.
Full on primary bind:


The mix becomes slightly lighter, pink in color. From the fat being incorporated into the meat. It sticks to the side of the bowl, like dough. In fact it sticks to everything, even silicon. And it holds shape. Mix too much beyond here and you start to fuck up the texture.
A stiff silicon spatula is a really key thing for this section BTW.
Tasters! This is your last chance to adjust seasoning and flavorings.


Came out perfect. Springy and juicy, and still tastes like pork. But you can definitely taste the apple, leaks, and thyme.
@Gyrofrog, the big one is for bungs.

9 Likes
Thanks for the grinder tips. The mixer on the fritz that I own is a lift-bowl model - I loved it until it started acting up. At some point I might just open the poor thing up and see if I can diagnose and/or fix what is going on instead of having to purchase a new one. The 3-deer-day was a bit of an outlier from our usual meat-handling capacities, which is normally around the 2-4 kg realm 
6 Likes
Here’s where it gets bad.
When stuffing your sausage lube is important.
The innernets will tell you food grade silicone is the best option.
I keep it casual and go with this over priced avocado oil spray. The stuffer lives in the freezer till it’ll burn your finger tips, you spray the oil up in there and it’ll solidify on contact. Gives a buffer so the meat moves through smoothly.

You need to fill the canister up with minimal air pockets, air pockets are bad. They blow out your casings and make stuffing a beast.
The best way to do this is to start with big balls.
You gotta slam your balls into the canister pretty hard. Throw them in so they smack against the bottom.
And no I’m not joking.

Then you press it in using your knuckles, pressing air out as you go. The goal is no air pockets. Smooth it out and slap it with another ball till it’s full.
It’s a 5lb machine so it won’t hold the whole batch, extra balls go to the freezer till it’s time to refill.


You gotta wrap your nozzle. Or to use the technical term, tube. But don’t forget to lube it first.


These are pre-tubed, pre-washed casings. Basically they’re salted and preserved casings that are washed and soaked for you, then passed over a plastic sleeve with a pull tab. Then salted and bagged again. They’re a lot easier to work with, stink a whole lot less, and are generally higher quality. Plus they come in specific diameters, in reasonable quantities. Otherwise the only other way to get specific sizes is to order wholesale quantities. I forget the specific length on these. But there’s generally 3 spans of casing, each will do 3-5 lbs. They’re pricier but they’re 100% worth it.
Just thread the sleeve over the tube, push the casings back, and pull the tab. I almost always load the whole sleeve. You can’t ever be sure just how much you’ll need. And extra can be pulled off and stored in brine for months.


You crank the handle till the sausage is at the end of the stuffing tube, then pull the casing over the top. Leaving some extra length.
Usually I just knot the casing, but that can trap a bit of air. So this time I tried string, which is how you do it with artificial casings like the vegan ones I use for alpha-gal safe chicken and duck sausage (casings are mammal intestines otherwise). There’s less loose space when you tie things off, which lead to some blow outs. So I won’t be doing that again.
5 Likes
Unfortunately I’m taking these pictures myself so it’s a bit impossible to show certain things. But from here we stuff.
You crank the machine with one hand (or have a friend do it), and basically you loosely grip the tube to tension the casings. How full the casings get is a factor of how fast the meat is pumped, and how much tension you put on the skin. You want them full, so the casings stretch. But not as full as they can possibly be. As linking is gonna shift shit around and tighten everything up.


There was a weird break in the first length of casing, leading to the lonely sausage in the upper right. That end of the rope had some weak spots in it which lead to blow outs. But I got at least one full length rope of sausage.

Some amount of meat always stays in the stuffer. More with vertical ones over horizontal apparently. There are tools for forcing this stuff into a casing, or pushing it out cleanly.
I just hit it with a wooden spoon. Then pack it into a plastic baggy, divide it with a bench scrapper, and immediately freeze. Easy patties.


I like tying sixes, it’s quicker and seems to work better. Here’s a video dudes a little douchy, and he’s British. So while he knows what he’s doing, he’s a little obsessed with putting rusk into everything and grinding it too fine. But it’s the clearest video of tying sausage this way I’ve found.


The loose stuff is the result of a blow out. Basically just skinned a link, it’ll be breakfast.

The last step is called blooming.
The sausage needs to be left to sit, uncovered for a while. At least a few hours at room temp. Preferably over night in the fridge. You want air to be able to circulate around it.
During this time the casings dry out and shrink, tightening everything up, sealing the knots and generally getting better. The meat itself will knit together more firmly, setting up into a fairly fixed shape. And the casings will attach to the meat so they don’t just burst and peel off when you cook em.
~24hrs in the fridge, in the same aluminium roasting pan. On a rack.
8 Likes
Looking good.
3 Likes

Lamb’s lettuce. No dressing as such, just a sprinkle of sugar and a splash of lemon juice. My favourite for this kind of salad. There is always some left at the bottom of the bowl - pour it into a glass, add some water and an ice cube - and voila, lemonade with extra clorophyll.
Some chicken I found in the freezer, with sweet-and-sour sauce.
Some yesterday’s baguette warmed up in the toaster oven.

9 Likes
Approval from the sausage countries is all I desire in life.
7 Likes
Nice! Thanks for the idea.
9 Likes